Skip to content

Mobility

Trap 3 Raises: The Ultimate Guide To Building Massive Traps And Achieving A Dominant Physique!

Welcome to mobilityabilityagility.com, your go-to site for mobility exercises and training. In this article, we will investigate the efficacy of Trap 3 Raises, an exercise that targets the frequently overlooked middle back muscles. Learn how this exercise can help you improve your upper body strength and mobility.

Trap 3 Raises

Understanding Trap 3 Raises

The trapezius muscle is generally linked with the trapezoid form, but did you realise it actually has three rows? Trap 3 Raises especially target the third row of your back, which is positioned in the centre of your back. Although this exercise is initially difficult, practising it on a back extension machine delivers an even more severe workout.

Setting Up for Success

Even if you start with only your own body weight, setting up for Trap 3 Raises is straightforward and comfortable. As you gain strength, gradually increase the resistance. Strive for at least 10% of your body weight in each hand, and execute 10 repetitions without bending your elbows.

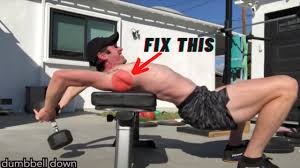
Proper Form for Trap 3 Raises

To guarantee good form during Trap 3 Raises, follow these guidelines.:

  1. Maintain a comfortable and stable posture when using the back extension machine.
  2. Begin the technique by extending your arms out to the sides, parallel to the floor.
  3. Continue lifting your arms until they are parallel to your body and form a 45-degree angle.
  4. To optimise muscular engagement, avoid bending your elbows during the exercise.
  5. Strive for a smooth and controlled movement, focusing on your centre back muscles.
  6. Like with any workout, viewing yourself from a side angle may assist guarantee appropriate form and technique.

Progression and Weight Recommendation

Increase the resistance progressively over time to optimise the advantages of Trap 3 Raises. Begin with your own body weight and progressively add weight as you gain comfort and strength. Maintain good form and technique for at least 10 repetitions every set.

Benefits of Trap 3 Raises

Adding Trap 3 Raises into your workout regimen has various advantages, including:

  • Developing the often-overlooked middle back muscles
  • Improved upper-body mobility and stability
  • Enhancing posture and alignment in general
  • Assisting with good shoulder function
  • Increasing upper-body injury prevention

Form and Feedback

While today’s linear mobility practise focuses on numerous drills, monitoring your technique and providing feedback isn’t always essential. Nonetheless, you are always welcome to do so, and we urge you to look at yourself from a different perspective for further understanding.

Congrats on finding the great advantages of Trap 3 Raises for strengthening and activating the muscles in your middle back. You may improve your upper body mobility, stability, and general strength by including this exercise into your regimen and using perfect technique. Accept the challenge, advance steadily, and get the benefits of a stronger and more robust upper body. Continue your excellent effort and explore the huge realm of mobility training at mobilityabilityagility.com.

QL Extension: The Ultimate Guide To Banishing Back Pain And Achieving Unstoppable Resilience!

QL Extension

QL Extension: Enhance Mobility and Alleviate Back Pain

Welcome to mobilityabilityagility.com, your one-stop shop for mobility exercises and training. This post will go through the QL Extension exercise, which is a strong movement that targets the Quadratus Lumborum (QL) muscles. The QL Extension is an excellent addition to your mobility regimen since it enhances flexibility, relieves back discomfort, and promotes general spinal health. Let’s look at the advantages and method of the QL Extension.

The QL Extension is a mobility exercise that focuses on the Quadratus Lumborum muscles in the lower back. These muscles are essential for supporting the spine, stabilising the core, and promoting appropriate posture. You may improve the mobility and functioning of your lower back by introducing the QL Extension into your practise.

Benefits of the QL Extension

  1. Enhanced Spinal Mobility: The QL Extension targets the muscles that control spinal stability and movement. Frequent practise can help you improve your range of motion and enhance spinal health.
  2. Back Pain Relief: Many people suffer from back pain as a result of poor posture or muscular imbalances. The QL Extension can assist reduce lower back stress and stiffness, decreasing discomfort and facilitating pain-free mobility.
  3. Strengthening the QL muscles, which are strongly related to the core muscles, can improve core stability and total functional strength.
  4. Injury Prevention: By strengthening supporting muscles and improving spinal alignment, mobility exercises like the QL Extension can help avoid back problems.
  5. Better Posture: The QL Extension can help improve posture and reduce strain on other muscle groups by targeting the QL muscles and fostering improved spinal alignment.

Performing the QL Extension

  1. Form: Lie on your side with your legs outstretched. Keep your body in a straight line and rest your head on your lower arm for support.
  2. Technique:
    a. Lift your upper leg slowly off the ground while maintaining your knee straight. Consider raising your leg towards the ceiling.
    b. Maintain the posture for a few seconds, feeling your QL muscles contract.
    c. Return your leg to the beginning position slowly.
  3. Reps and Sets: Continue 10-12 repetitions on each side, increasing the number of sets as your strength and comfort level improves.

Safety Tips and Modifications

  1. Pay Attention to Your Body: Keep an eye out for any discomfort or pain during the activity. If you feel any sharp or severe discomfort, stop exercising and see a healthcare practitioner.
  2. Progressive Progression: Begin with a range of motion that is comfortable for you and gradually increase the intensity and length of the exercise as your body adjusts.
  3. Get Expert Guidance: If you have pre-existing back concerns or are hesitant about completing the QL Extension, it’s essential to seek assistance and adjustments from a competent trainer or healthcare practitioner.

The QL Extension is an excellent addition to your mobility training regimen, providing various advantages for your lower back health, spinal mobility, and general posture. By implementing this workout into your routine, you may increase your mobility, relieve back discomfort, and overall quality of life. Accept the QL Extension and discover the transforming impact of focused mobility training now.

for more click here

Unlock Your Hip Flexor Strength with the Reverse Squat Strap: Power Up Your Lower Body and Achieve Resilient Hips

the Reverse Squat Strap

Welcome to mobilityabilityagility.com, your one-stop shop for mobility exercises and training. In this post, we’ll look over the Reverse Squat Strap’s revolutionary effects and efficacy. You may improve your sprinting and leaping ability, build lower body strength, and create sturdy hips by targeting your hip flexor muscles. Ready to release your entire potential by exploring the magic of the Reverse Squat Strap!

Understanding Hip Flexors and Their Crucial Role

Hip flexors are the muscles that elevate your legs during actions such as running and leaping. Your legs get stronger and more powerful as you build your lower body. This increased leg strength necessitates the use of your hip flexors, making it critical to exercise and strengthen these muscles. The Reverse Squat is a game changer because it focuses and improves your hip flexors, allowing them to assist your whole body strength.

Elevate Your Performance with the Reverse Squat Strap

The Reverse Squat Strap is your secret weapon for developing strong hip flexors and realising your athletic potential. By including reverse squats into your training regimen, you may improve both your speed and strength. The Reverse Squat Strap gives you the support and stability you need to improve your technique, enabling you to concentrate on activating your hip flexors and optimising your lower body power.

Benefits of the Reverse Squat Strap for Hip Flexor Development

  1. Enhanced Hip Flexor Strength: The Reverse Squat Strap especially targets and improves your hip flexor muscles, helping them to match the demands of your lower body strength training.
  2. Increased Running and Jumping Performance: You may improve your running pace, vertical jump height, and overall athletic performance by creating tough hip flexors.
  3. Increased Lower Body Power: With the Reverse Squat Strap, you may work different muscle groups in your lower body, resulting in improved power and explosiveness.
  4. Injury Prevention: Strong hip flexors are essential for maintaining good alignment and lowering the likelihood of injuries including hip discomfort, strains, and imbalances.
  5. Versatile Training Tool: The Reverse Squat Strap allows you to grow gradually, modify difficulty, and customise your exercises.

Incorporating Reverse Squats into Your Training Routine

  1. Set up: Provide adequate support and stability by securely attaching the Reverse Squat Strap to a sturdy surface or anchor point.
  2. Form: Stand facing away from the anchor point, wrap the Reverse Squat Strap around your shoulders or upper arms, and squat with appropriate form and hip flexor engagement.
  3. Gradual Progression: with less resistance and progressively raise the challenge as your hip flexor strength develops. Pay attention to your body and make any adjustments.

The Reverse Squat Strap is a revolutionary gadget that targets and improves your hip flexor muscles, resulting in improved running, leaping, and general lower body strength. You can unlock the strength and resilience of your hip flexors by introducing this unique strap into your training programme, pushing your performance to new heights. Adopt the Reverse Squat Strap to increase hip flexor strength and reach athletic brilliance like never before!

for more click here

Unleash Your Full Potential with ATG Buddies: Elevate Your Training and Optimize Your Performance

ATG Buddies

Welcome to mobilityabilityagility.com, your go-to site for mobility exercises and training. We are excited to introduce you to the game-changing ATG Buddies in this post. These adaptable tools are intended to improve your training experience and assist you in achieving outstanding outcomes. ATG Buddies are your go-to heel raisers for bringing your knee-related workouts to new heights, whether you’re working on ATG squats, VMO squats, or ATG split squats. Prepare to discover the tremendous advantages of introducing ATG Buddies into your workout programme.

Meet the ATG Buddies

ATG Buddies are simple to use and incredibly portable, letting you to carry them wherever you go. These are the ideal partner for numerous knee-related exercises, especially when used in conjunction with the well-known Knees Over Toes method. Let’s look at the advantages of ATG squats, VMO squats, and ATG split squats.

Elevating Your ATG Squats

ATG squats, also known as “ass to grass” squats, require lowering yourself into a deep squat posture with your glutes below your knees. By using ATG Buddies, you can lift your heels, giving you more depth and better balance during your squats. Its increased range of motion more effectively utilises your muscles, assisting you in developing strength, stability, and mobility.

Amplifying VMO Squats with ATG Buddies

VMO (vastus medialis oblique) squats emphasise knee stability and alignment while targeting the inner quadriceps muscle. You may further stimulate and engage the VMO muscle group by using ATG Buddy. The elevated heel posture improves your squat form by allowing you to focus on proper muscle activation and alignment.

Maximizing ATG Split Squats with ATG Buddies

Split squats with ATG are an excellent exercise for building lower body strength, balance, and flexibility. You may raise your back foot with ATG Buddies, increasing the difficulty and efficacy of the exercise. This variation deepens the stretch and places more demands on your stabilising muscles, delivering a full-body exercise for your lower body.

Unlocking More Possibilities

ATG Buddies, in addition to ATG squats, VMO squats, and ATG split squats, provide a plethora of training options. These adaptable tools may be used for a variety of workouts such as lunges, step-ups, and more. You may target particular muscle areas, improve stability, and build total lower body strength by introducing ATG Buddies into your practise.

Congrats on finding ATG Buddies’ wonderful perks. You may increase your performance, strength, and mobility by including these flexible tools into your training routine. ATG Buddies give support and stability for your ATG squats, VMO squats, and ATG split squats. Allow these cutting-edge tools to help you reach new heights in your training. With ATG Buddies, you may embrace the opportunities and realise your full potential.

for more click here

Reverse Squat: Unlock Your Potential for Mobility and Strength

The Reverse Squat

Reverse Squat: Unleash Your Hip Flexor Strength and Power

Welcome to mobilityabilityagility.com, your one-stop shop for exercises and training in mobility. This article will go over the amazing advantages and methods of the reverse squat, a specific exercise made to strengthen the hip flexor muscles. The Reverse Squat is a game-changer for anyone looking to improve their overall strength and mobility, whether they are a sprinter seeking explosive lower body power or someone else. Let’s examine the specifics and learn how this exercise can help everyone, from competitive athletes to regular exercise enthusiasts.

Understanding Hip Flexor Strengthening

The hip flexor muscles, a collection of muscles at the front of your hips, are the focus of the reverse squat. On your back, while using resistance attached to your feet—such as a strap attached to a cable machine or a resistance band—bring your knees to your chest.

Through the Reverse Squat, you can fully activate the hip flexors and reap all of its health and fitness benefits. Many people suffer from weak hip flexors. Your hip flexors can also be tight. Lower back pain, hip pain, and injury can all result from tight and weak hip flexors. Yoga poses and other hip flexor exercises can help to relax the muscles. Additionally we need strength. We can get this from the reverse squat.

Benefits of the Reverse Squat for Explosive Lower Body Power

  1. Sprinters’ Secret Weapon: The Reverse Squat has long been a mainstay in the training regimens of sprinters and other athletes who need to have explosive lower body power, like running backs. This exercise enhances the drive and power produced from the legs during explosive movements by working the hip flexor muscles.
  2. Enhanced Athletic Performance: Strengthening the hip flexors through the reverse squat can help athletes perform better in a variety of sports, including sprinting, jumping, and direction-changing movements.
  3. Increased Range of Motion: The Reverse Squat encourages hip flexor flexibility and mobility, giving you more range of motion for exercises like high knee lifts and kicks that call for deep hip flexion.
  4. Core Activation: Reverse squats improve core strength and stability, which improves overall athletic performance. Core activation: During the Reverse Squat, your core muscles contract to stabilise your body.
  5. Versatility for All: Programmes like the ATG Knees Over Toes, which highlight the Reverse Squat’s value for people of all fitness levels, have helped it gain recognition outside of the world of professional athletes. For anyone looking to improve hip flexor strength and overall lower body power, it presents a flexible exercise option.

Performing the Reverse Squat

  1. Starting Position: Laying on your back with your knees bent and your feet flat on the ground is the starting position. Use a strap to secure a cable machine, or wrap your feet in a resistance band.
  2. Technique:
    • a. Engage your core and firmly grasp the resistance band or strap of the cable machine.
    • b. While keeping control and tension on the strap or band, slowly bring your knees up to your chest.
    • c. Take a brief break at the top of the movement and concentrate on tightening your hip flexors.
    • d. Return your legs gradually to the starting position while keeping tension and control throughout the exercise.
  3. Repeat: As your strength and comfort level grow, gradually increase the number of sets you perform, aiming for 10–12 repetitions each time.

Safety Tips and Modifications

  1. Take Note of Your Body: While performing the exercise, pay attention to any discomfort or pain. Stop exercising right away and seek medical advice if you feel any severe or sharp pain.
  2. Proper Resistance Selection: Select the right amount of resistance to challenge your muscles while still enabling good form and control throughout the movement.
  3. Seek Professional Advice: It is advised to speak with a qualified trainer or healthcare provider for advice and modifications if you have any pre-existing hip or lower back conditions.

The Reverse Squat is an effective exercise that targets and strengthens the muscles in the hip flexors, unlocking explosive lower body power and improving athletic performance. Additionally, The Reverse Squat offers a variety of advantages. Moreover, whether you’re a sprinter, an athlete looking to increase their agility, or a regular person looking to maximise your lower body strength.

Accept the strength of this exercise and be amazed at the improvements it can make to your performance, mobility, and overall fitness. With the reverse squat, you can strengthen and amplify your hip flexors.

Additionally for more go to:

mobility ability agility

Pullover: The Ultimate Guide To Building A Powerful Chest And Back – Unlock Your Full Potential!

Pullover

Pullover: Improve Mobility and Enhance Upper Body Strength

Welcome to mobilityabilityagility.com, your trusted source for mobility training and exercises. The benefits and strategies of the Pullover exercise will be discussed in this article. The pullover is a versatile activity that stimulates the upper body while also improving flexibility and overall mobility. Let’s go into the specifics of this amazing activity.

Understanding the Pullover

The pullover is a classic exercise that primarily works upper-body muscles such as the chest, back, and shoulders. It entails a controlled movement that is similar to hauling a weight aloft. You can improve your upper body strength and flexibility by including the Pullover into your mobility training routine.

Benefits of the Pullover

  1. Upper Body Strength: The Pullover activates the muscles of the chest, back, and shoulders, assisting in the development of strength and definition in these areas.
  2. Shoulder Mobility: This exercise needs a wide range of motion in the shoulders, which promotes flexibility and mobility in this important joint.
  3. Improved Core Stability: When executing the Pullover, your core muscles contract to stabilise your body, resulting in increased core strength and stability.
  4. Increased Chest Expansion: The Pullover stretches the chest muscles, which improves posture and allows for deeper, more efficient breathing.
  5. Back Health: The Pullover exercise can help decrease back discomfort and enhance overall spinal health by strengthening the muscles of the upper back.

Performance

  1. Starting Position: Begin by lying down on a bench or stability ball with your head, upper back, and shoulders supported. With both hands, grasp a dumbbell or a weight plate and stretch your arms straight above your chest.
  2. Technique:
    • a. Inhale deeply while keeping your arms straight, then lower the weight in an arc motion behind your head while keeping your elbows slightly bent.
    • b. Exhale as you pull the weight back up over your chest to return to the beginning position.

Safety Tips and Modifications

  1. Start Light: If you’re new to the Pullover exercise, start with a smaller weight or none at all. Before progressively increasing the resistance, concentrate on learning the technique.
  2. Maintain proper form: by keeping your core engaged and avoiding overly arching your lower back during the action. To reduce strain on the shoulder joints, execute the exercise with a slightly bent elbow if necessary.
  3. Seek practitioner Advice: If you have any pre-existing shoulder or back conditions, you should seek advice and modifications from a competent trainer or healthcare practitioner.

The pullover exercise is a great approach to increase upper body strength, shoulder mobility, and overall flexibility. By including this exercise into your mobility training regimen, you can benefit from a stronger, more resilient upper body as well as enhanced mobility and a lower chance of injury. Embrace the Pullover to maximise your upper body strength and flexibility.

mobility ability agility Pullover

Elephant Walk: Embrace The Challenge, Crush Your Fears, And Emerge As The Unstoppable Force!

Elephant Walk

You’ve come to the right place if you’re looking for mobility training and exercises: mobilityabilityagility.com. We will explore the amazing advantages of the Elephant Walk. Indeed, a potent exercise that works the hamstrings, calves, hips, and lower back. You can increase flexibility, improve athletic performance, prevent injuries, and encourage healthy ageing by incorporating this exercise into your routine.

The Elephant Walk and Its Mechanics

The Elephant Walk is a dynamic workout in which the knees are bent and extended as the hips are hinged forward. This exercise routine focuses on the hamstrings, calves, hips, and lower back. You may enhance your flexibility and range of motion by activating these muscle groups.

Unlocking the Benefits

  1. Improved Hamstring Flexibility: The Elephant Walk stretches the hamstrings, which are important for motions like running, jumping, and squatting. Improved hamstring flexibility can lead to improved performance and a lower chance of muscle injuries.
  2. Increased Hip Range of Motion: The exercise also develops hip flexibility, which allows for better mobility and stability during daily activities and sports. It can assist to reduce hip stiffness and pain while also improving overall movement quality.
  3. Athletic Performance Improvement: Flexible hamstrings and hips are essential for athletic performance. You may improve your agility, speed, and power by implementing the Elephant Walk into your training programme, providing you an advantage in a variety of sports and hobbies.
  4. Injury Prevention: Tight hamstrings and restricted hip mobility might increase the likelihood of strains and sprains. Regular Elephant Walk practise can minimise muscle imbalances and improve joint alignment, minimising the risk of injury during athletic activity.
  5. Healthy Ageing: Maintaining flexibility becomes increasingly vital as we age. The Elephant Walk promotes greater posture, mobility, and independence in everyday life by counteracting the natural loss of flexibility that comes with age.

Performing the Elephant Walk

  1. Starting Position: To make the exercise more accessible, place your hands on an elevated surface, such as a bench or step. Reduce the height of the surface gradually until you can easily reach the floor.
  2. Proper technique: Stand with your feet hip-width apart, slightly bend your knees, and lean forward at the hips while maintaining your back straight. Your hamstrings and calves should feel a slight stretch.
  3. Controlled Movement: Extend your knees slowly, pulling your hips back and reaching towards the floor. Maintain control during the exercise, concentrating on the stretch in your back legs.
  4. Breathing and Duration: Hold the extended position for 10-30 seconds, breathing deeply and naturally. Repeat the exercise for 3-5 sets, progressively increasing the number of reps.

Safety Precautions and Modifications

  1. Pay Attention to Your Body: Pay attention to your body’s responses and modify the stretch intensity accordingly. To avoid strain or injury, do not push yourself beyond your comfortable range of motion.
  2. If reaching the floor is difficult, use supports like yoga blocks or books to hold your hands at a height that allows for a comfortable stretch.
  3. Individual Considerations: If you have any current knee or lower back concerns, you should check with a healthcare practitioner before undertaking the Elephant Walk to verify it is appropriate for your requirements.

Furthermore, including the Elephant Walk in your mobility training regimen can result in significant gains in hamstring flexibility, hip range of motion, athletic performance, injury avoidance, and healthy ageing. Remember to use good technique, listen to your body, and advance slowly on your flexibility journey. Indeed, Accept the Elephant Walk and get the advantages of improved mobility and general well-being!

For more click here:

mobility ability agility

Couch Stretch: The Ultimate Guide To Unlocking Supple Hips And Taking Control Of Your Mobility!

Couch Stretch

Unleash Your Mobility Potential: Mastering the Couch Stretch for Knee and Back Pain Relief

The Couch Stretch is a particular mobility training exercise. Indeed, It stands out for its potency in treating knee and back pain. Moreover, In order to relieve tightness and imbalances that lead to discomfort, this potent stretch concentrates on the quadriceps and hip flexors. Furthermore, We’ll go through the advantages, appropriate technique, and advice for implementing the Couch Stretch. Additionally you can add it into your mobility training programme in this detailed article. Indeed, prepare to unleash more range of motion and wave goodbye to knee and back discomfort!

Benefits of the Couch Stretch

Improved Hip Flexibility: The Couch Stretch focuses on the tight hip flexor muscles. These develop from extended sitting or repetitive motions. Regular application of this stretch will help you loosen up your hips and get your hip joint back to working properly.
Reduces Knee Pain: By altering biomechanics and putting stress on the knee joint, tight hip flexors can make knee pain worse. The Couch Stretch can relieve knee pain by lengthening and releasing these muscles, which eases the strain on the knees.

Reduces Back Pain: Unbalances in the pelvis brought on by tight hip flexors can result in lower back pain. The Couch Stretch helps relieve back pain by loosening and stretching the hip flexors and restoring proper pelvic alignment.
Corrects Postural Imbalances: Sedentary lifestyles and extended periods of sitting can cause postural imbalances like an anterior pelvic tilt. By correcting these imbalances, the Couch Stretch encourages better posture and lessens the associated discomfort.

Proper Technique for the Couch Stretch

Set up: Place yourself facing away from a solid object, like a couch or a wall. In a lunge position, place one knee on the ground with the top of the foot and shin touching it.

Posture and Alignment:

  • a. Maintain a neutral spine and an upright stance.
  • b. Contract your abdominal muscles to support your spine and pelvis.
  • c. Maintain ankle-knee alignment and refrain from making sharp inward or forward movements with the front knee.
  • d. The back leg should be extended behind you, resting on the floor with the knee and top of the foot.
  • e. Make sure your front foot and the knee that is resting on the ground are equally bearing the weight.

Tips for Effective Couch Stretching

Gradual Progression: As your flexibility increases, start at a comfortable distance from the supporting surface and progressively deepen the stretch over time.
Timeframe and Recurrence: Repeat the stretch two to three times on each side, holding it for 30 to 60 seconds on each side. At least twice or three times a week, try to include the Couch Stretch in your mobility training regimen.
Relaxation and Breathing: During the stretch, concentrate on deep, diaphragmatic breathing to promote relaxation and a greater release of tension in the hip flexors and quads.
Modifications: If placing the knee on the ground causes discomfort, support it with a folded towel or a cushion. A yoga block can also be placed beneath the front foot.

Safety Considerations and Precautions

Listen to Your Body: Recognise your body’s signals and refrain from enduring severe discomfort or pain. Stretching and minor discomfort are typical, but severe pain should be avoided.
Consult a specialist: Before including the Couch Stretch in your routine, speak with a qualified healthcare professional if you have any concerns about your ability to do it safely or if you already have knee or back conditions.

The Couch Stretch is a highly efficient mobility exercise that improves hip flexibility. Additionally, it helps with knee and indeed, back pain, and improves movement in general. Moreover, you can gain the advantages of increased mobility, decreased knee and back pain, and improved general wellbeing by incorporating this stretch into your mobility training regimen and using the right technique and guidelines. Correspondingly, embrace the Couch Stretch as a valuable tool in your journey towards a pain-free, active lifestyle.

Otherwise, for more visit:

mobility ability agility

ATG Squat: Start Fixing Knee Pain Right Now

ATG Squat

Mastering Mobility: The ATG Squat Progression for Stronger and Pain-Free Knees

Mobility training plays a crucial role in maintaining a healthy and functional body. When it comes to lower body mobility and strength, the ATG (Ass to Grass) Squat is an effective and progressive exercise. This comprehensive guide will take you through the benefits, proper technique, and key progressions of the ATG Squat. While, enabling you to improve mobility, alleviate knee pain, and build a resilient lower body.

Understanding the ATG Squat

The ATG Squat is a set of workouts that get harder over time. Moreover, helping you develop better squatting technique and depth. The goal of this phase is to get into a deep squat, when the hips are below parallel with the knees. Moreover, You can improve mobility, build lower body strength, and lessen your risk of knee and back problems by performing these exercises in this order.

Benefits of the ATG Squat

  1. Increased mobility: The muscles and joints in the lower body, especially the hips, knees, and ankles, are the focus of the ATG Squat Progression. You can increase your range of motion and flexibility in these regions by progressively increasing your squat depth.
  2. Strengthening of the lower body: The quadriceps, hamstrings, glutes, and calves are among the key muscle groups that are worked throughout the ATG Squat Progression. You’ll develop lower body strength and power as you move through the variants.
  3. Improved Knee Stability: By completing squats fully, you strengthen the muscles that support your knees, increasing stability and lowering your chance of injury and knee pain.
  4. Core Engagement: To maintain balance and stability while squatting, the core must be engaged. Furthermore, Your core muscles are tested by the ATG Squat Progression, which results in enhanced core strength.
  5. Functional Movement: Sitting down and standing up are two actions that the deep squat position practised in the ATG Squat Progression simulates. It makes it easier for you to execute these tasks and eases the strain on your back and knees.

Proper Technique

  1. Body Position: Ensure that your feet are somewhat broader than shoulder width apart and slightly pointed outward when standing.
  2. Execution: a. Start with a bodyweight squat, concentrating on keeping your spine neutral and pulling your hips back as you descend.
    • b. Gradually deepen your squats, trying to keep your knees from being parallel to the ground while maintaining good form.
    • c. As you advance, you can increase the difficulty by placing a barbell or dumbbell over your shoulders.
    • d. Pay attention to maintaining a raised chest, knees that are parallel to the ground, and balanced weight on your feet.
    • f. To get back to the starting position, press through your heels.
    • f. Repeat as many times as necessary, progressively stepping up the difficulty as you get more acquainted with the exercise.

Key Progressions of the ATG Squat

  1. Goblet squat: While performing the squat, keep a dumbbell or kettlebell near to your chest. This variant encourages appropriate posture and balance.
  2. Barbell Back Squat: You can advance to the barbell back squat if you’ve mastered the bodyweight and goblet squats. With a barbell over your upper back, apply more resistance to your squats.
  3. Overhead squat: Holding a barbell or weight plate overhead while squatting is part of this advanced version known as the overhead squat. Your balance, stability, and core strength are put to the test.

Safety Considerations and Modifications

  1. Squats performed with only your bodyweight are a good place to start. Instead of aiming for depth, concentrate on keeping appropriate form.
  2. Before starting the ATG Squat Progression, speak with a medical expert if you have knee pain or other issues that have existed in the past.
  3. Use a TRX suspension trainer or a stability ball against a wall to modify the exercise and help with balance and stability.


A useful technique for enhancing lower body flexibility, strength, and overall functionality is the ATG Squat Progression. You may build stronger, pain-free knees by progressively increasing your squat depth and incorporating the critical progressions. Always prioritise perfect form. While, paying attention to your body, and move forward at a rate that is appropriate for your skill level. Use the ATG Squat Progression as part of your mobility training programme. Develop a lower body that is more resilient.

For more visit:

mobility ability agility

g