Skip to content

Uncategorized

Resisted Butterfly: Unleash Powerful Hams And Sculpted Glute Muscles For Men 30+ – The Physique That Will Leave You In Awe!

Resisted Butterfly

Resisted Butterfly: Enhance Mobility and Alleviate Knee and Back Pain

Welcome to mobilityabilityagility.com, the trusted source for training and activities that improve mobility. The Resisted Butterfly is a potent exercise. It targets the hip muscles, strengthens the core, and helps to reduce knee and back discomfort. We will examine this exercise in this post. The Resisted Butterfly is a useful addition to your mobility training programme, whether you’re an athlete aiming to enhance performance or someone seeking solace from discomfort.

Understanding the Resisted Butterfly Exercise

A dynamic mobility exercise called the “Resisted Butterfly” aims to improve range of motion and engage the hip muscles. Through the controlled use of resistance bands, this exercise develops the muscles’ strength, stability, and flexibility.

Benefits of the Resisted Butterfly

Hip Mobility Enhancement: The hip abductors and external rotators are the focus of the Resisted Butterfly, which increases their flexibility and range of motion. Hip mobility can improve overall movement quality, lower the chance of injury, and improve athletic performance.
Strengthening the Core: The exercise works the lower back and abdominal muscles, which help to stabilise and support the body during movement. For appropriate posture, balance, and a lower risk of back discomfort, a strong core is necessary.


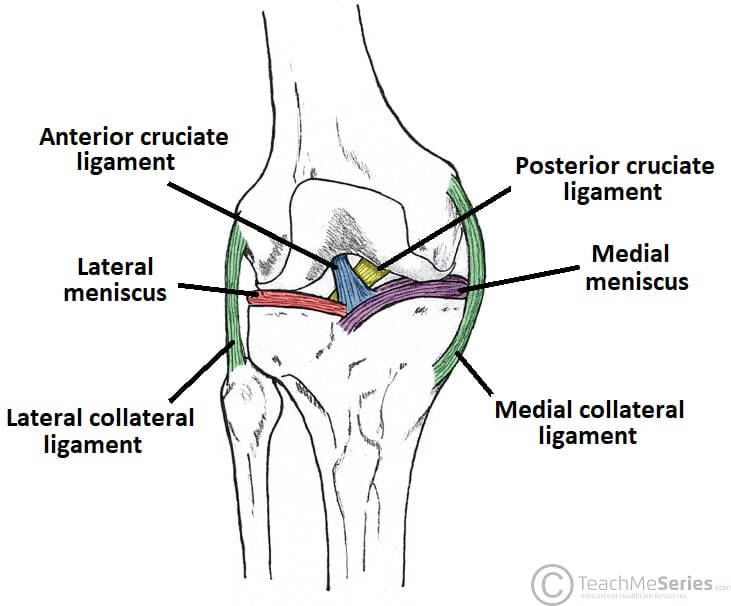
Knee pain relief: Weak hip muscles can make knee pain and discomfort worse. The Resisted Butterfly helps stabilise the knee joint by bolstering the hip abductors, which eases strain and encourages good alignment.
Back Pain Relief: The Resisted Butterfly exercise supports the lower back by using the core and hip muscles, which eases stress and tension. This can improve the health of the spine and reduce back discomfort.

Proper Technique

Set up the Resistance Bands: One end of a resistance band should be fastened to a reliable anchor point at ankle level. Make sure the band is securely fastened to your ankle by attaching the other end to it.
Starting Position: Maintain a straight posture as you stand tall with your feet shoulder-width apart. Also, For balance and stability, hold onto a solid object like a wall or a chair.


Movement Execution: Maintain tension in the resistance band as you slowly raise one leg away from your body’s centre. Again repeat on the other leg after a controlled return to the starting position.
Breathing and Repetitions: Exhale as you drop the leg after lifting it. Indeed As your strength and comfort increase, progressively increase the resistance and repetitions to 10–12 on each leg.

Tips for Effective Resisted Butterfly Training

Start with Light Resistance: To guarantee good form and technique, start with a lighter resistance band. Increase the resistance level progressively as you gain confidence and skill.
Focus on Controlled Movements: To effectively engage the target muscles, move slowly and deliberately while performing the Resisted Butterfly exercise. Also avoid swinging or using momentum.
Engage the Core: Then draw your belly button towards your spine to keep a strong core throughout the exercise. furthermore, Your body will become more stable and your lower back will be safeguarded.
Consistency is Key: Include the Resisted Butterfly in your regimen for practising mobility. Then, to noticeably enhance mobility and pain relief, aim for at least two to three sessions per week.

Safety Considerations and Precautions

Listen to Your Body: While performing the exercise, pay attention to any discomfort or pain. Stop immediately and seek medical attention if you feel sharp or severe discomfort.
Proper Warm-Up: Prior to doing the Resisted Butterfly exercise, prioritise a complete warm-up. Besides, This can involve mobility exercises and modest dynamic stretches to get your body ready for the movement.


Individualization: To meet your needs and fitness level, adjust the resistance band tension and exercise intensity. Because everybody is different, you should modify the exercise to fit your skills and limits.
Seek Professional Guidance: Before beginning the Resisted Butterfly or alternatively, any new exercise regimen, speak with a licenced healthcare or fitness expert if you have any current medical conditions, injuries, or concerns.

The Resisted Butterfly exercise is a powerful mobility training exercise that develops the core, focuses the hip muscles, and eases knee and back discomfort. You can increase stability, increase hip mobility, moreover get pain relief by including this exercise in your programme. Always prioritise good technique, pay attention to your body, and seek professional advice as necessary. Accept the Resisted Butterfly to open the door to greater mobility and wellbeing!

for more visit:

Resisted Butterfly

g

Slant Calf Stretch: The Ultimate Guide To Unleashing Powerful Calves In 4 Simple Steps!

The Slant Calf Stretch is a powerful exercise for increasing mobility and reducing knee pain. This straightforward but effective stretch targets the plantar fascia, Achilles tendon, and calf muscles, bringing relief and improving flexibility. This article will go through the advantages, correct execution, and several variants of the slant calf stretch so you may use it as part of your mobility training regimen and get more mobility.

Understanding the Slant Calf Stretch

The gastrocnemius and soleus muscles in the calf are the focus of the slant calf stretch, a mobility exercise. To increase the stretch and focus on the deeper calf muscles, one must place the foot on an inclined surface, such as a slant board or step. Regular application of the Slant Calf Stretch will increase ankle flexibility, ease lower leg tightness, and enhance mobility in general.

Benefits of the Slant Calf Stretch

  1. Increased Ankle Flexibility: The Slant Calf Stretch gives the calf muscles and Achilles tendon a deep stretch, increasing the flexibility and range of motion of the ankle. The ability to move more fluidly while walking, sprinting, and jumping is made possible by increased ankle mobility.
  2. Relief from Knee Pain: Pain and stiffness in the knees might be aggravated by tight calf muscles. Regular calf stretches, such as the Slant Calf Stretch, can help release tension in the calf muscles and lessen pressure on the knee joint, which may lessen knee pain and promote healthy knee function.
  3. Injury prevention: An enhanced range of motion in the ankles and flexible calf muscles can help prevent common lower body ailments. You can lessen your risk of lower leg and knee sprains, strains, and other injuries by including the Slant Calf Stretch in your mobility training.
  4. Better Posture: Postural imbalances like an extreme forward lean or a flat foot posture can be caused by tight calf muscles. You may encourage appropriate alignment by stretching your calves, which can improve your overall posture and reduce any resulting back pain.

Proper Technique for the Slant Calf Stretch

  1. Set Up: Find a slant board, step, or elevated surface to set up on. Put your heel off the edge and the ball of your foot on the edge of the elevated surface.
  2. Execution:
    • a. Maintain a straight back and use your abs for stability.
    • b. Feel for a calf muscle stretch as you gradually bring your heel down towards the floor.
    • c. Focus on deep breathing while holding the stretch for 15 to 30 seconds, allowing the muscles to unwind.
    • d. Gently return your heel to the beginning position, then do the same with the other leg.
    • e. Apply the stretch for 2-3 sets on each leg.

Variations and Modifications

  1. Single-Leg Slant Calf Stretch: To increase attention and intensity, place the opposite leg behind the leg you are stretching.
  2. Wall Calf Stretch: Use a wall as support if a slant board or step are not available. Use the same method as the Slant Calf Stretch and place your hands on the wall at shoulder height.
  3. Seated Calf Stretch: Legs stretched in front of you while seated, stretch your calves. To stretch your calf muscles, wrap a towel or resistance band over the ball of your foot and gradually pull it towards you.

Safety Considerations

  1. Gradual Progression: Start with a mild incline and gradually increase the intensity of the stretch over time.
  2. Listen to Your Body: If you feel any sharp pain or discomfort during the Slant Calf Stretch, reduce the intensity or stop the exercise. It’s important to listen to your body and avoid overstretching.

Slant Calf Stretch

A useful supplement to any mobility training programme is the Slant Calf Stretch. You can increase ankle flexibility, relieve knee pain, and increase mobility overall by including this exercise in your routine. Start incorporating the Slant Calf Stretch into your workouts to start seeing the amazing changes in the mobility and health of your lower legs.

Find more at mobilityabilityagility.com

g

FHL Calf Raise: Explode Your Lower Leg Power Double Your Mobility

FHL Calf Raise

FHL Calf Raise

The FHL Calf Raise is a potent exercise. It targets the muscles of the lower leg and foot and is excellent for increasing lower leg strength and mobility. You may increase lower leg strength, ankle stability, and overall mobility by including this exercise in your programme. We will examine the advantages, method, and variants of the FHL (Flexor Hallucis Longus) Calf Raise in this post, giving you the tools you need to advance your mobility training.

Unleashing the Power of the FHL Calf Raise

The Flexor Hallucis Longus (FHL) Calf Raise is a mobility exercise made to develop the flexor hallucis longus, a muscle that runs down the back of the lower thigh and attaches to the big toe. The FHL Calf Raise uses these muscles to improve lower leg strength as well as ankle stability and flexibility, allowing you to move with grace and elegance.

Benefits of the FHL Calf Raise

  1. Strengthened Calf Muscles: The gastrocnemius and soleus muscles in the calf are the primary targets of the FHL Calf Raise. Your calves can get stronger and more robust by including this workout in your regimen, which will enhance the strength of your lower legs as a whole.
  2. Improved Ankle Stability: The FHL Calf Raise emphasises ankle stability and works to build up the muscles that support this joint. You may walk more confidently by lowering your risk of ankle sprains and other problems with increased ankle stability.
  3. Increased Proprioception and Balance: The FHL Calf Raise tests your body’s proprioception, which is your perception of where it is in space. You can improve your ability to retain balance and coordination, which will lead to better general mobility, by performing this exercise on a daily basis.
  4. Injury Avoidance: Back and knee pain can be caused by weak calf muscles and unstable ankles. You may reduce your risk of developing these typical aches and pains by using the FHL Calf Raise to strengthen your calf muscles and encourage ankle stability.

Mastering the Technique

  1. Starting Position: Make sure your posture and alignment are correct by standing tall with your feet hip-width apart.
  2. Execution:
    • a. Slowly lift your heels off the floor and rise onto your balls of your feet.
    • b. As you raise, concentrate on using the flexor hallucis longus and the calf muscles.
    • c. Hold the higher position for a brief period of time while feeling your calves and foot muscles contract.
    • d. After the desired number of repetitions, gently lower your heels back to the ground and repeat the exercise.

Variations for Progression

  1. Single-Leg FHL Calf Raise: To make the exercise more difficult and to make the muscles work harder, perform it while raising only one leg at a time.
  2. Weighted FHL Calf Raise: To increase resistance and fortify the muscles in the lower leg, use dumbbells or wear ankle weights while executing the exercise.
  3. Tempo Variation: To extend time under strain and intensify the workout, try using varied tempos. For example, you might hold the raised posture for a longer period of time or incorporate gradual eccentric (lowering) phases.

Safety Considerations and Modifications

  1. Start with Bodyweight: If you are unfamiliar with the FHL Calf Raise or have any concerns about the strength of your lower legs, start with bodyweight exercises and gradually increase the intensity as your muscles get used to them.
  2. Take Note of Your Body: While performing the exercise, pay attention to any discomfort or pain. Consult with a certified healthcare or fitness professional for advice and adaptations catered to your unique needs if you experience knee pain or other discomfort.

FHL Calf Raise

Your lower leg strength, ankle stability, and overall mobility can all be significantly improved by include the FHL Calf Raise in your mobility training regimen. You can move with grace and resilience by contracting the flexor hallucis longus and the calf muscles. Experience the transforming effects the FHL Calf Raise may have on your mobility and general well-being by starting to incorporate it into your exercises.

for more go to mobilityabilityagility.com

g

Improve Your Mobility

Improve Your Mobility

Click here to display content from YouTube.
Learn more in YouTube’s privacy policy.

Improve Your Mobility and Flexibility

Improve Your Mobility and Flexibility, Ben, introduces a mobility and flexibility exercise in this video that aims to strengthen several muscle groups. The value of flexibility and how it might improve athletic performance are stressed by him. The exercise is made to be scalable, which allows for various levels of fitness to be accommodated. Let’s investigate the benefits of the exercises.

Start with the Big Toe

Ben begins by talking about the importance of the big toe in terms of mobility. He says a lot of patients who have knee problems also have tight big toes. It becomes simpler to lean back and enhance overall mobility by progressively putting pressure on the big toe and developing flexibility.

Addressing Calf Muscles

Ben then draws attention to the stiffness in the calf muscles, which is sometimes brought on by modern footwear with extra heel cushioning. He uses a slat board to show how a quick workout may loosen up this stiffness and additionally increase flexibility. People can lean forward and increase their movement by actively engaging their calves.

Expanding to the Hips

Ben introduces hip-targeting movements while concentrating on hamstring and upper calf tension. He shows how to hold a 90-90 position and discusses how simple it is to do so by regularly stretching. These exercises aid in maintaining flexibility and improving lateral mobility, both of which are essential for a variety of sports.

Internal Rotation and Hip Flexibility

The presenter talks about how crucial internal rotation is for hip flexibility. He argues that exercising the hips on both sides is advantageous for sports that call for lateral motion. Ben displays various postures for enhancing internal rotation, such as leaning back and then using the Sartorius muscles.

The Butterfly Stretch and Couch Stretch

Ben then performs the butterfly stretch, which focuses on the muscles in the groyne. He advises supporting yourself against the wall while progressively deepening the stretch. He also highlights the sofa stretch, an activity that can change a person’s life after having knee surgery. Maintaining consistency in these stretches promotes lower body mobility and flexibility.

Full Range of Motion

The final exercise in the lower body mobility regimen, the ass to grass split squat, is shown by the presenter. Without elevating the heel or touching the back knee to the floor, he displays the ideal front hamstring position with the calf covered. Full range of motion is required for this exercise, and Ben understands that not everyone will be able to do so right away.

Shoulder Routine

Ben starts a bonus exercise that emphasises shoulder mobility. To avoid shoulder problems, he emphasises the significance of strong external rotation muscles. People can strengthen their shoulder joint’s flexibility and range of motion by performing workouts like pullovers and external rotation. Athletes who play football and tennis will especially benefit from this.

Improve Your Mobility

Finally stresses the value of combining strength and flexibility in preserving total mobility. No matter where they are at right now, he exhorts people to begin working on their flexibility because sustaining flexibility is easier than developing it. Individuals can improve their sports performance and lower their chance of injuries by regularly including these workouts into their routines.

for more mobility visit:

mobility ability agility

or

YT

Big 8 For The Lower Back

Fixing the Low Back

Click here to display content from YouTube.
Learn more in YouTube’s privacy policy.

Big 8 For The Lower Back

A Comprehensive Approach to Improving Lower Back Health

Fitness presenter Ben discusses his personal experience and knowledge of enhancement for the lower back health in this interesting video. Ben has created an eight-zone holistic method after learning from his own experiences with imbalances and back issues. These zones target a variety of lower back issues with the hopes of reducing pain, enhancing mobility, and boosting athletic performance.

Zone 1: Lengthening the Hip Flexors:

Ben emphasises the significance of doing so and offers helpful advice on how to do so. He describes his personal experiences with particular workouts that lengthen the hip flexors and strengthen them, addressing imbalances and enhancing leg strength.

Zone 2: Bringing Nature Back into Balance:

The modern lifestyle frequently causes imbalances. This adversely affects the lower back of our bodies. Ben’s method emphasises on opening up the hip flexors and correcting knee abnormalities in order to restore natural balance. He describes how these imbalances can lead to pain while engaging in specific activities and provides ways and exercises to strengthen and balance the knees and legs, enhancing performance.

Zone 3: Ideal Squat Mobility and Posture:


Ben discusses the link between squat mobility and keeping good posture. He offers insightful advice on how to perform squats with appropriate posture, including the idea of heel elevation. Ben explains the advantages of advancing from flat ground to loaded workouts gradually to improve squat mobility and lessen lower back stress.

Zone 4: To improve hip mobility and strengthening the Core Muscles:

Ben advises doing seated good mornings and split squats with full range of motion to strengthen the muscles that surround the lower back. He offers methods for gradually raising the weight and difficulty so that people can build strength, stability, and greater back support.

Zone 5: Targeted Stretches for Hip Flexors:

Ben explains the stretches from the pigeon family, which successfully target the inner hips and hip flexors. He describes how to modify and intensify these stretches over time, resulting in better back mobility and perhaps a resolution of knee problems.

Zone 6: Developing the Lower Traps

Ben emphasises the significance of focusing on the lower traps, which are essential for lower back health. He performs an effective workout for these muscles and offers step-by-step instructions for gradually boosting strength and stability in this area.

Zone 7: Strengthening the Core – Lower Abdomen Focus:

Ben provides workouts that specifically target the lower abs, an area that is sometimes overlooked in core training. He offers a variety of exercises, including the use of cable machines, to build a strong lower abdomen and a balanced core.

Zone 8: Addressing Quadratus Lumborum (QL) Imbalances:

Ben discusses the quadratus lumborum (QL) muscles and their significance for lower back health in the final zone. He discusses the ways in which certain activities can cause muscle imbalances in various areas and offers stretching and strengthening exercises for the quadriceps that improve balance and lower back health in general.

Big 8 For The Lower Back

In this thorough video, Ben imparts his knowledge and helpful suggestions for improving lower back health. By employing his eight-zone strategy,

People might strive to lessen discomfort, increase mobility, and enhance sports performance. Ben provides a holistic approach to lower back care, emphasising overall well-being and practical movement, along with his exercise suggestions and explanations.

for more go to:

mobility ability agility

or

YT

How to Fix Sciatica [THE SURPRISING TRUTH]

How to Fix Sciatica [THE SURPRISING TRUTH]

Click here to display content from YouTube.
Learn more in YouTube’s privacy policy.

How to Fix Sciatica: Understanding the Causes and Effective Treatments


Squat University covers How to Fix Sciatica, a frequent and excruciating condition brought on by the sciatic nerve being pinched, in this video. The movie focuses on diagnosing and treating the problem, and it begins by defining sciatica and discussing some of its potential causes.

Understanding Sciatica and Determining the Source


Sciatica is defined as the pinching of the sciatic nerve, which runs from the low back, through the hip, and down the leg. The pinching can occur anywhere along the nerve’s path, including the low back or the hip from the piriformis muscle. Identifying the source of the pinching is crucial in determining the appropriate treatment.

Screening for Pinching in the Low Back


Sciatica is characterised by a pinching of the sciatic nerve, which passes through the hip and leg from the low back. Anywhere along the nerve’s course, such as the hip from the piriformis muscle or the low back, moreover, be pinched. The best course of action must be determined by locating the pinching’s origin.

Possible Causes of Pinching in the Low Back


Various conditions, including disc herniation, facet joint enlargement, or thicker ligaments, might result in low back pinching. One of the main causes of sciatica in younger people is disc herniation, in which the disc pushes out and compresses the nerves.

Treatment for Pinching in the Low Back


Once the low back pinching is established, additionally emphasis changes to minimising triggers and controlling discomfort. It’s crucial to stay away from painful positions like flexion and extension. Take frequent breaks from extended sitting, use a lumbar roll or towel to improve spinal alignment while sitting, and keep your posture neutral while performing tasks to assist ease symptoms.

Pinching from the Piriformis Muscle


The piriformis muscle is an additional possible source of sciatica. When this muscle is tight or in spasm, the sciatic nerve that runs around or through it can cause discomfort that radiates down the leg. Additionally effective therapy depends on distinguishing between short and long piriformis syndromes otherwise.

Determining Short or Long Piriformis Syndrome


An observation of internal rotation is done to identify the kind of piriformis syndrome. It is possible to identify if a patient has a short or long piriformis syndrome by comparing the internal rotation on the affected side to the side without discomfort. In contrast to extensive internal rotation, which shows a long piriformis, similarly, limited internal rotation on the affected side indicates a small piriformis.

Treatment for Short Piriformis Syndrome


Stretching exercises are helpful for short piriformis syndrome. Correspondingly, Crossing the leg, externally rotating the hip, and drawing the leg towards the chest are all helpful stretches. Additionally, applying pressure and massaging the piriformis with a tablet or lacrosse ball might help alleviate pain.

Treatment for Long Piriformis Syndrome


Stabilising and strengthening the piriformis muscle are crucial in the treatment of long piriformis syndrome. A side plank clamshell exercise, in which the person holds a side plank position while elevating and twisting the hip, is advised. This exercise also activates the lateral hip muscles and focuses on stability.

Nerve Flossing

Despite of the cause of your sciatica, nerve flossing exercises can help you feel better faster. The sciatic nerve is moved up and down throughout these activities without being stretched. The person can lessen the severity of their symptoms by doing nerve sliders or flosses.

How to Fix Sciatica

Indeed, effective pain management and recovery from sciatica depend on finding the cause of the condition and putting the right treatments in place. Identifying where the pinching is coming from

See more at:

mobility ability agility

YT

Top 3 Ankle Mobility Exercises [Strong Ankles]

Click here to display content from YouTube.
Learn more in YouTube’s privacy policy.

Top 3 Ankle Mobility Exercises for Better Squat Technique


In this video, Dr. Andhor Segin shares his top three ankle mobility exercises to help improve squat technique. Ankle mobility limitations are a common problem that can hinder proper squat form. By addressing ankle mobility, we can enhance the depth and stability of our squats. Let’s dive into the exercises!

Ankle Mobility Assessment:
To determine if ankle mobility is a limitation for you, Dr. Andhor suggests a simple test. Stand facing a wall or the end of a room with your feet shoulder-width apart. Look for a distance of about five inches between your big toe and the wall. Try to drive your knee directly over your second or third toe without your heel lifting off the ground. If you can’t reach the wall without your heel popping up, it indicates an ankle mobility limitation.

Joint Mobilization Exercise:
If you experience a pinched or blocked sensation in the front side of your ankle, it signifies a joint restriction. To address this, Dr. Andhor recommends using a thick band for joint mobilization. Place the band around your ankle, just above the talus bone. The band should exert tension on the bone, helping it glide backward when you move your knee over your toe. Perform a gliding motion with the band, driving your knee forward and back. This exercise improves the natural joint movement of the ankle.

Bench Stretch:
To stretch the tissues on the backside of your ankle, Dr. Andhor suggests a simple bench stretch. Find a bench or box and position yourself with one foot on the bench. Drive your knee directly over your toe while holding onto the bench for support. You can also use your chest to pull down, intensifying the stretch. Focus on feeling the stretch in your soleus muscle, located in the lower leg. Hold the position for a desired duration, tailored to your needs.

Stretch Duration Considerations:
The duration of stretches depends on individual needs and goals. Longer stretches of 30 seconds to a minute can be beneficial for individuals with significant limitations and restricted mobility. However, it’s important to note that longer stretches may temporarily decrease muscle strength and power. For those preparing for intense training or competition, shorter stretches of around ten seconds with multiple repetitions are recommended to avoid performance detriments.

Goblet Squat Ankle Stretch:
Another effective ankle mobility exercise is the goblet squat ankle stretch. Holding a weight plate or kettlebell in front of you, assume a squat position with your feet shoulder-width apart. As you squat down, drive your knees over your toes while maintaining a good posture. This exercise targets ankle mobility directly and helps improve squat technique for movements like cleans, snatches, and front squats.


Improving ankle mobility is crucial for achieving better squat technique. By addressing ankle mobility limitations through joint mobilization exercises, bench stretches, and goblet squat ankle stretches, you can enhance your range of motion and achieve deeper, more stable squats. Remember to test and retest your ankle mobility after performing these exercises to assess their effectiveness. Incorporate these top three ankle mobility exercises into your training routine and enjoy better squatting!

For more go to:

mobility ability agility

YT

How to Fix Lower Back Pain (INSTANTLY!)

Fixing the Low Back

Click here to display content from YouTube.
Learn more in YouTube’s privacy policy.

How to Fix Lower Back Pain: Simple Tips for a Healthy Back

Are you bothered by lower back pain? Well, you’re in luck because this video is here to help you fix it! Let’s dive into some simple yet effective techniques that can provide relief and improve your overall well-being. The presenter will guide us through various exercises and strategies to alleviate the discomfort and prevent future occurrences of lower back pain.
Firstly, let’s understand the muscle that’s often responsible for this type of pain: the glute medias. This muscle plays a vital role in keeping your pelvis level and supporting your hips. When it’s weak or strained, it can lead to imbalances and discomfort in your lower back. But fear not, we have solutions!
One technique involves applying pressure to a specific spot while moving your leg in a certain direction. This simple action can bring immediate relief. By placing your thumb on the targeted spot and moving your leg, you can effectively alleviate the pain and tension in your lower back. Remember, it’s crucial to avoid using objects like lacrosse balls when you’re in pain, as they can exacerbate the inflammation. Instead, focus on gentle, controlled movements that you can perform on your own.
To strengthen the glute medias and prevent future pain, let’s explore a couple of exercises. The first exercise involves using a wall for support. By lifting one leg up and ensuring the hip doesn’t drop to the side, you can activate and strengthen the outside hip muscles. This exercise promotes stability and balance, helping to alleviate lower back pain. Aim for 10 to 15 repetitions and perform it several times a week.
Now, let’s introduce another unique exercise called the “sac swinger.” Using a dog leash and a weight (such as a kettlebell or a dip belt), you’ll step into the leash and secure it around your waist. This setup may look a bit unconventional, but trust me, it works wonders! As you walk, the weight hanging beneath your legs challenges your muscles even further, enhancing their strength and mobility. Give it a try and feel the burn!
In addition to these exercises, it’s crucial to stay active and maintain a healthy lifestyle. Regular physical activity and mindful movements can contribute to a stronger back and reduced pain. Remember to listen to your body and avoid activities that worsen your discomfort.
By following these simple yet effective techniques and incorporating them into your routine, you can experience relief from lower back pain and improve your overall quality of life. Don’t let pain hold you back any longer—take charge of your well-being and embrace a pain-free future.
In conclusion, if you’re tired of dealing with nagging lower back pain, there are solutions available to you. By understanding the underlying causes and incorporating targeted exercises into your routine, you can alleviate discomfort and prevent future occurrences. Remember, consistency is key. Stay committed to your exercises, maintain an active lifestyle, and listen to your body. With these strategies, you can say goodbye to lower back pain and hello to a healthier, happier you. So, what are you waiting for? Start implementing these techniques today and enjoy a life free from the burden of lower back pain!

More available at:

mobility ability agility

YT

4 Exercises to Improve Knee Mobility

4 Exercises to Improve Knee Mobility

Click here to display content from YouTube.
Learn more in YouTube’s privacy policy.

4 Exercises to Improve Knee Mobility

In this video, we learn about knee mobility and how to test and improve our range of motion. The knee joint is unique because it can flex, extend, and even rotate. To optimize knee health, we should focus on four movements: sagittal plane flexion, sagittal plane extension, transverse plane internal rotation, and transverse plane external rotation.

For sagittal plane flexion, we should aim for the knee to bend around 135 to 145 degrees. To improve this range, we can perform heel slides and use our hands to gently pull the knee towards the chest, holding the stretch for an extended period.

Sagittal plane extension involves straightening the knee, aiming for zero degrees of hyperextension. To stretch this part of the joint, we can place a book or yoga block under the heel and let gravity pull the knee into extension. Additional stretching tools like ankle weights or a heat pack may be used for more intense stretches.

In the transverse plane, we focus on internal and external rotation. To test this, we sit with our knees bent at 90 degrees and pivot the foot, keeping the ankle stable. Internal rotation should be about 10 degrees, while external rotation can reach 30 to 40 degrees. Using our hands or a tool, we can assist the rotation and hold the stretched position to improve joint mobility.

By incorporating these exercises into our routine and gradually increasing the duration and intensity, we can enhance our knee mobility and recover from injuries. If you have any questions, feel free to ask in the comments section.

Find more at:

mobility ability agility

YT

How to Start Improving Bad Knees Right Now

How to Start Improving Bad Knees Right Now

Click here to display content from YouTube.
Learn more in YouTube’s privacy policy.

How to Start Improving Bad Knees, even without any fancy equipment. Here’s what you can do: Start with a 10-minute walk, but try walking backward instead. Or you can do 25 tibialis raises. These exercises work the muscles around your knees and make them stronger. When your muscles are stronger, it helps your knees heal and makes them less likely to get hurt.

I know these exercises work because they helped me achieve my dream of being able to dunk a basketball. Now, when I play basketball, I feel amazing because my knees don’t hurt anymore. I used to rely on surgeries, painkillers, and icing all the time just to get through the day. But now, I haven’t had any problems with my knees for ten years, all thanks to these simple exercises.

But it’s not just about doing the exercises. It’s also about doing them the right way. I learned this from watching an incredible athlete named Bryce Harper. He always tries to do every exercise perfectly. Seeing his dedication made me realize that to get the best results, you have to give your all in every workout.

So, I decided to follow Bryce Harper’s example. I won’t settle for doing exercises halfway. I’ll strive to do each one perfectly. I won’t try to lift heavier weights until I can do the exercises with my own body weight. I believe that this approach will make my training year a success, just like it did for Bryce.

It’s important to set goals for yourself. One goal is to be able to lift your heel while keeping good form. That might sound simple, but it’s an important step. Another goal is to be able to do 25 reps of the exercise with weights in each hand. I found that reaching this goal can really change your life. Even being able to do the exercise with just your body weight is a big accomplishment.

But be careful when you want to go beyond those goals. It’s important to think about what you want to achieve and talk to a coach if you want to do more. For me, in the next year, I’ll focus on doing each rep perfectly, rather than trying to lift heavier weights. I believe this will make my training year a big success.

While the exercises are important, I also want to talk about the tibialis raise. This exercise works a muscle called the tibialis that often gets ignored. Some people feel a burning sensation or heel pain when doing this exercise. I recommend wearing supportive shoes and easing the pressure by alternating sides. If you’re more advanced, you can try doing the exercise on one leg, but start with the basics and gradually work your way up.

I’m really grateful to Bob Guida, the person who came up with the tibialis raise. His clever idea, many years ago, changed the way athletes stay in shape. Even though this exercise isn’t as popular now, it made a big difference in my own fitness journey.

To help more people do these exercises, I’ve worked with equipment makers to create the Tip Bar. It’s a simple tool that works well. You can find the Tip Bar in stores now, and I even started my own equipment company to offer it at lower prices. I want to share my knowledge and make it affordable for everyone who wants to improve their knee health.

I want to say a big thank you to the ATG community for their support. Without them, I wouldn’t be here, making videos and sharing the ATG system. I appreciate their trust and support, and together, we’ve built a great community that helps and encourages each other. It’s not just about winning or losing—it’s about being part of the game of life.

As Thanksgiving approaches, I wanted to say thank you and express my gratitude. My journey

of overcoming knee issues has been life-changing, and it’s all thanks to these exercises. I encourage you to try them, give them your all, and see the difference they can make. And remember, while pursuing your own goals, don’t forget to show kindness and support to others. Together, we can achieve greatness and help one another along the way.

https://mobilityabilityagility.com/

ATG | Personal Training Reinvented

ATG Online Coaching
https://www.atgonlinecoaching.com